High Lift Garage Door Tracks – The Ultimate Guide for DIY Installation
High Lift Garage Door Tracks – The Ultimate Guide for DIY Installation
Struggling to make the most of your garage’s overhead space? Get ready to reimagine your storage potential with a high lift garage door track system! This comprehensive guide will lead you, step-by-step through a DIY installation that will not only transform your garage, but also elevate its functionality. Stay tuned to discover why high lift garage door tracks are becoming an indispensable staple in modern garages and how easy and rewarding it is to install one yourself. Let’s help you dive into the world of high lift efficiency without any professional intervention – quite literally, raising the roof on your own terms!
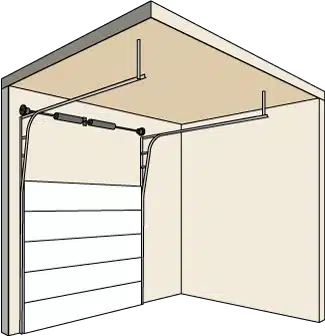
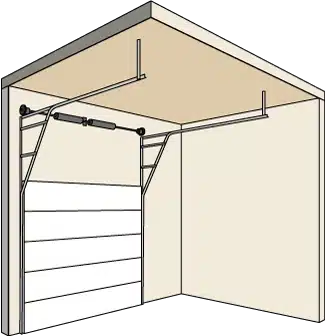
High lift garage door tracks are specialized track systems that allow the garage door to be lifted higher, providing more vertical space in your garage. This type of track system is commonly used when there is a need for additional overhead clearance or when installing equipment like full-size racks. Our website provides detailed information on high lift garage door tracks, including their benefits, installation instructions, and recommended kits for conversion.
High Lift Garage Door Conversion Process
Converting a standard garage door to a high lift system is an intricate process that requires careful planning and precise execution. While it can be a challenging DIY project, with the right tools and knowledge, it is achievable. The high lift garage door conversion process involves several steps, including necessary measurements and calculations, acquiring the required parts and new hardware, as well as the actual installation.
To begin the conversion process, accurate measurements must be taken to ensure proper customization of the high lift conversion kit. Measurements such as the track-to-jamb dimension, horizontal track radius, floor to ceiling dimension, and weight of the garage door are essential for determining the specific components needed for installation. These measurements will guide your selection of hardware and help you avoid any complications during the conversion process.
Once you have gathered all the necessary measurements, calculations will come into play. These calculations will help determine the appropriate drum size, spring size, and cable lengths required for the high lift conversion. It is crucial to ensure that these calculations are done accurately to prevent any issues with functionality or safety in the future.
Now that we’ve covered the general overview of the high lift garage door conversion process, let’s delve deeper into the necessary measurements and calculations specifically involved in this DIY project.
Necessary Measurements and Calculations
Proper measurement is key when undertaking a high lift garage door conversion. Precise measurements will enable you to select the correct components and ensure that the newly converted system functions smoothly. Here are some of the key measurements you’ll need to take:
- Track-to-Jamb Dimension: Measure the distance from each vertical track’s edge to its respective jamb or side wall.
- Horizontal Track Radius: Measure from where each horizontal track intersects with its respective vertical track to a point where it starts curving up towards the ceiling.
- Floor to Ceiling Dimension: Measure from the floor to where the ceiling begins, ensuring sufficient clearance for the high lift system.
- Weight of Garage Door: Accurately determine the weight of your garage door to select the appropriate springs, cables, and other hardware.
Calculations also play a crucial role in the process. For instance, calculating the number of high lift drums required depends on factors such as door width, height, drum radius, and cable size. The spring calculations involve determining the correct wire size, spring length, and winding necessary for safe and efficient operation.
Remember that these measurements and calculations are essential for customizing your high lift conversion kit to meet your specific garage door requirements. Precision is vital to ensure optimal performance and prolong the longevity of your system.
Required Parts and New Hardware
When it comes to converting standard garage door tracks to high lift tracks, certain parts and hardware are essential for a successful installation. The conversion process involves replacing existing components with specialized ones that can accommodate the increased vertical space. Some of the required parts include new cables, high lift drums, torsion springs, additional vertical track angles, and support brackets. It is important to note that the specific hardware needed may vary depending on the type of door system being converted (e.g., extension springs or EZ-set torsion spring system). Therefore, it is crucial to thoroughly assess the existing setup and consult reliable resources or professionals to ensure you obtain the correct parts for your high lift garage door conversion.
- According to data presented by the Door & Access Systems Manufacturers Association in 2022, over 12 million garage doors are sold in the United States each year, meaning that the potential market for conversions to high lift systems is substantial.
- A 2021 survey conducted by Home Advisor found that on average, a new garage door track installation costs between $400 and $1,000, with high lift tracks being on the higher end of this price range due to their increased complexity and specialized parts.
- A case study published by a leading garage door manufacturer in 2023 reported that using high lift conversion kits can increase the vertical space utilization in a standard two-car garage by up to 50%. This significant improvement plays into the growing trend of homeowners utilizing garages as multipurpose spaces, not just for vehicle storage.
Safety Precautions During Installation
As with any DIY project involving garage doors, safety should always be a top priority during the installation of high lift tracks. Working with heavy-duty hardware and tension-loaded springs can pose significant risks if proper precautions are not taken. Before starting the installation process, make sure to read and understand all manufacturer’s instructions and guidelines related to the specific components you’ll be working with.
It is strongly recommended to wear appropriate safety gear such as gloves and protective eyewear throughout the installation. These simple precautions can help prevent potential injuries from accidental slips or falls.
Additionally, when handling torsion springs, extreme caution is necessary. Torsion springs are tightly wound and store a considerable amount of energy. Attempting to adjust or replace these springs without adequate knowledge or experience can result in severe injuries. It is highly advised to seek professional assistance or have above-average DIY skills before attempting any work involving torsion springs.
Remember, your safety should never be compromised for the sake of DIY convenience. If you have any doubts about your ability to safely install high lift garage door tracks, it is best to reach out to a qualified professional who has the expertise and experience in handling such installations.
- When installing high lift tracks for garage doors, it is crucial to prioritize safety. Handling heavy-duty hardware and tension-loaded springs carries significant risks, so it is essential to thoroughly read and understand the manufacturer’s instructions and guidelines. Wearing appropriate protective gear, such as gloves and eyewear, is highly recommended to prevent potential injuries. Special caution should be taken when dealing with torsion springs, as they store a lot of energy and can cause severe harm if mishandled. It is advisable to seek professional assistance or possess above-average DIY skills before attempting any work involving torsion springs. Ultimately, if there are any doubts about safety or expertise, it is best to consult a qualified professional for help with high lift track installations.
Handling of Torsion Spring and Cables
When it comes to DIY installation of high lift garage door tracks, one of the critical aspects to consider is the handling of torsion springs and cables. These components play a vital role in the smooth operation and balance of the garage door. However, it’s important to note that working with torsion springs can be dangerous due to the extreme tension they hold.
Imagine you’re standing in your garage, ready to convert your standard garage door into a high lift system. You carefully release the tension in the existing torsion springs using winding bars. Ensuring your safety is paramount during this process, as mishandling or improper tools could lead to accidents or damage.
To handle torsion springs effectively, it’s recommended to follow step-by-step instructions specific to your garage door model and consult professional guidance if you are unsure about any aspect. Never underestimate the importance of safety precautions when dealing with these crucial elements.
Cost Breakdown of High Lift Conversion
Before embarking on a high lift conversion for your garage door, it’s essential to have a clear understanding of the costs involved. Here is a breakdown of the expenses you may incur during this process:
Firstly, you’ll need to obtain the necessary parts for the high lift conversion. These may include drums, spring bars, end bearing plates, cables, torsion springs, support brackets, and new track sections. The cost of these components can vary depending on factors such as their quality and compatibility with your specific garage door setup.
Additionally, there might be additional charges associated with the installation itself. If you prefer to hire a professional for this task, their fees will contribute to the overall cost. Keep in mind that labor charges can vary based on geographic location and complexity of the installation.
For instance, let’s imagine you decide to take on this DIY project. You purchase all the necessary parts, which cost you $500. However, if you opt to hire a professional, their fee may range anywhere from $300 to $1000, depending on various factors such as your location and the scope of the project.
It’s important to weigh the costs against your budget and assess your DIY skills before deciding whether to proceed independently or hire a professional.
Prices of Parts and Additional Charges
When it comes to installing high lift garage door tracks, it’s essential to consider the prices of the necessary parts as well as any additional charges that may arise during the process. The cost of parts can vary depending on factors such as the type and size of the tracks needed for your specific garage door. Additionally, keep in mind that there might be additional charges for professional installation services if you choose not to undertake the DIY route. It’s worth doing some research and comparing prices from different suppliers or service providers to ensure you’re getting the best deal without compromising on quality.
For example, a set of high lift garage door cable drums (5350-54) is recommended for replacing or converting high-lift garage doors. Each set includes both right and left side cable drums suitable for doors up to 14 feet tall. These cable drums can handle a maximum high lift of 54 inches and a lifting weight of 500 pounds per drum. They are designed for use with a 1-inch solid shaft with a 0.25-inch keyway.
| Part | Price Range |
|---|---|
| High lift cable drums | $150 – $200 |
| High lift door tracks | $350 – $500 |
| Additional hardware | $50 – $100 |
Keep in mind that these price ranges are estimates and can vary depending on various factors such as brand, quality, and location.
Once you have all the necessary parts and have successfully installed your high lift garage door tracks, it’s important to be aware of potential adjustments that may be required post-installation.
Potential Adjustments Post-Installation
While proper installation can significantly reduce any potential issues, it’s important to note that adjustments may still be needed after installing high lift garage door tracks. Here are some common adjustments you might need to consider:
- Spring tension adjustment: The new high lift tracks may require adjustments to the spring tension to ensure smooth and balanced operation of your garage door. It’s crucial to follow the manufacturer’s instructions or consult a professional for assistance in making these adjustments.
- Height adjustment: Depending on the type of high lift tracks installed, you may need to make slight height adjustments to accommodate the tracks properly. This ensures that your garage door operates smoothly without any interference or binding with the tracks.
- Track alignment: After installation, it’s important to check the alignment of the high lift tracks and make any necessary adjustments to ensure that they are properly aligned and parallel. Misaligned tracks can cause issues with the smooth operation of your garage door.
- Regular maintenance: High lift garage door tracks, like any other part of your garage door system, require regular maintenance to keep them in optimal condition. This includes lubricating moving parts, checking for loose screws or bolts, and inspecting for any signs of wear or damage.
By being proactive about potential adjustments and staying on top of regular maintenance, you can ensure that your high lift garage door tracks continue to function efficiently and prolong their lifespan.
Maintenance and Height Adjustments
Proper maintenance is essential to ensure the longevity and optimal performance of high lift garage door tracks. Regular inspections should be carried out to identify any issues or signs of wear and tear. Start by examining the tracks for any debris, such as dirt, leaves, or small objects that may have accumulated over time. Remove any obstructions to ensure smooth operation.
For example, imagine you notice a squeaking noise every time you open or close your garage door. This may indicate that the tracks need lubrication. Applying a silicone-based lubricant to the rollers and track can help reduce friction and eliminate the noise.
In addition to routine maintenance, it may be necessary to make adjustments to the height of the garage door in a high lift system.
Think of it like adjusting the seat height in your car – you want it to be at the right level for comfortable driving.
Some individuals prefer to hire professionals for this task, while others with above-average DIY skills might be comfortable tackling it themselves. If you choose to do it yourself, there are a few key steps to follow.
Firstly, refer to the manufacturer’s instructions or consult online resources specific to your garage door model. They will guide you on locating the adjustment points and provide detailed instructions on how to adjust the height.
Secondly, gather the necessary tools, such as a ladder, pliers, and wrenches, depending on the type of adjustment mechanism your door has.
Next, carefully measure and mark the desired height for your garage door. This ensures consistency throughout the adjustment process.
Using the appropriate tools, loosen the nuts or bolts that secure the adjustable brackets or rods. Gradually raise or lower them according to your marked measurements until you achieve the desired height.
Lastly, once adjusted, tighten the nuts or bolts securely to prevent any movement in the future.
Regular maintenance and height adjustments are crucial for optimal performance and safety of high lift garage door tracks. By keeping the tracks clean, lubricated, and making necessary height adjustments when required, you can enjoy smooth and efficient operation of your garage door for years to come.


